How to Manage Cables for a Multi Device Station?

Time:2026-10-08 Author:Charlotte
0%

A multi-device station can look efficient until six cables cross beneath one desk. Chargers, monitors, docks, speakers, and external drives often compete for the same narrow space. The result is more than visual clutter. It can slow troubleshooting, block airflow, and place stress on connectors. How to manage cables for a multi-device station begins with understanding how the station is actually used. A neat photograph is not enough. Daily charging habits, device movement, and future upgrades all shape a reliable layout.

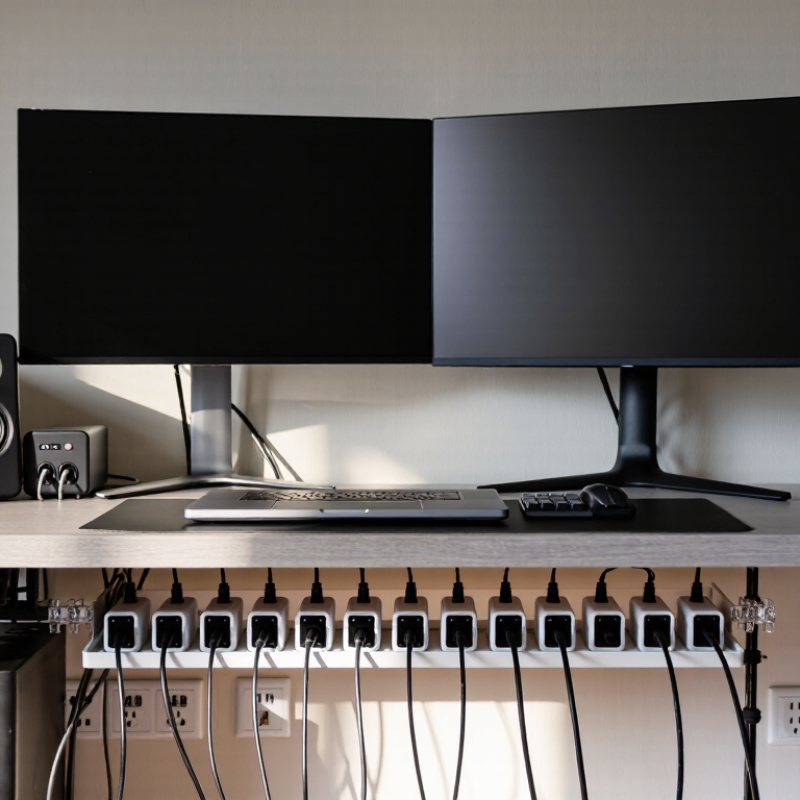
In practice, effective cable management starts with mapping every connection. Mark power, display, network, and accessory leads before moving anything. Then group cables by function, not simply by color. A shallow cable tray can hold power bricks, while adhesive clips guide lighter leads along the rear edge. Leave a small service loop near each device. That extra length makes cleaning and repairs easier without pulling a port from its housing. Labels at both ends also reduce guesswork when a screen suddenly loses its signal. Use strain relief wherever a cable bends sharply. Never pack adapters tightly against heat-producing equipment.

Good systems remain understandable months later. That requires durable labels, accessible outlets, and a layout another person can follow. It also requires honest review. My own setups have looked tidy but failed when a laptop moved two inches. A perfect arrangement may not survive real work. Recheck the station after a week, then adjust slack, routes, and charging positions. With practical testing and careful documentation, a multi-device station can become safer, quieter, and easier to maintain.
How to Manage Cables for a Multi Device Station?

Assess the Devices and Cable Requirements

A reliable multi-device station starts with an honest device inventory. List every laptop, monitor, phone, dock, lamp, storage drive, and accessory. Record each device’s power input, data ports, connector type, and usual position. Do not trust memory. I once counted six cables and found eleven in the drawer. That mistake caused a crowded outlet and several loose connections. Note which devices operate continuously and which charge occasionally. A monitor may need power and video, while a phone may need power alone. Small differences matter.

Measure the route from each device to the outlet or central hub. Add enough slack for movement, but avoid long coils behind the desk. Choose the shortest practical route with a small service allowance. Check whether each cable supports charging, data transfer, video, or several functions. Their appearance can be similar, yet their performance may differ. Confirm power levels and data speeds through manuals or cable markings. Incompatible requirements can cause slow charging, flickering displays, or failed connections. Keep power cables separate from sensitive signal cables where possible.

Sketch the station before buying replacements. Mark connection points, cable paths, and spare ports. Leave capacity for one future device, not five imaginary ones. I often overestimate future needs, then regret the extra cables. Label both ends with simple, readable tags. Test every cable under normal use, including charging and display output. Check heat, bending, and connector tension after installation. A tidy layout is not automatically a safe one. Recheck it after a week. Daily use reveals problems that planning misses.

Choose a Practical Cable Management Layout

A practical cable layout starts with the station, not the cables.

Place the display, computer, charger, and network equipment where they are used. Then measure each cable’s actual path. The 2024 Global E-waste Monitor reported 62 million tonnes of electronic waste worldwide in 2022. More devices mean more cables, so planning matters. Keep power cables on one side and data cables on the other. This reduces crossings and makes faults easier to trace.

Use a vertical cable tray or under-desk channel as the main route. Leave a small service loop behind each device. About 10 to 15 centimetres is usually enough for movement and replacement.

Label both cable ends, not just the visible end. Use soft hook-and-loop ties instead of tight plastic ties. They protect insulation and allow changes.

Keep adapters off the floor. Place them in a ventilated basket with clear spacing. Heat needs somewhere to escape.

Think in zones. Power stays low. Data stays separate. Frequently moved cables remain near the front edge. Fixed cables stay behind the tray.

The 2023 Global Data Center Survey from Uptime Institute found that power problems remain a major cause of serious outages. A crowded adapter cluster is not a data center, but the same discipline applies. I still leave one spare route unused. It feels inefficient. Later, that empty space often saves time.

Check the layout after one week. The first arrangement is rarely perfect.

Label and Route Cables by Function

A multi-device station becomes easier to maintain when every cable has a clear function. Use four groups: power, data, display, and peripherals. Label both ends with the device name, purpose, and destination. “Monitor 2—Display—Port B” is more useful than “HDMI.” Keep labels readable after installation. Small mistakes become expensive later.

Route cables by function, not by convenience. Separate power cords from data lines where possible, and cross them at right angles when paths must meet. Leave a gentle service loop behind each device. Tight bends can damage cables and complicate repairs. The TIA-606-C administration standard supports consistent identification for telecommunications infrastructure. Its principles also work well for desks and equipment stations. Color coding helps, but it should not replace written labels.

I once bundled every cable into one thick sleeve. It looked clean, but troubleshooting became slow. That was a poor choice. A better layout uses short, labeled bundles with removable ties and a simple routing map. Uptime Institute’s 2023 Global Data Center Survey reported that 60% of respondents had experienced an outage during the previous three years. Human error remains a practical risk. Clear labels reduce guessing during changes, inspections, and urgent replacements. Review the station every few months. Unused cables often stay longer than expected.

How to Manage Cables for a Multi-Device Station?

Label and route cables by function to reduce clutter, simplify troubleshooting, and keep frequently moved connections accessible.

This example organizes a six-device workstation into functional cable groups. Power and display cables typically need the most slack, while network and USB cables can follow shorter, dedicated routes.

Secure, Conceal, and Protect the Cable Runs

A multi-device station becomes safer when every cable has a planned route. I begin by grouping cables by function: power, data, display, and charging. This reduces tangles and makes faults easier to trace. I measure each run with a little slack, but not enough to form loops under the desk. Shorter paths look cleaner. They also reduce pulling pressure on plugs and ports.

Secure cables with reusable ties, clips, or a shallow cable tray. Avoid crushing them against sharp metal edges. At the desk’s rear, I leave a gentle bend near each connection. This prevents repeated movement from damaging the outer jacket. For floor runs, use a protective cover or route them along a wall. Never place loose cables across a walking path. A small label at both ends can save twenty minutes during troubleshooting.

Conceal the runs without trapping heat. Keep power cables separate from sensitive signal cables when practical, especially around audio equipment. Do not hide damaged cables behind panels or inside crowded, unventilated spaces. I inspect the station monthly for loose clips, bent plugs, and warm adapters. That check is easy to skip. I still miss one occasionally. When a cable supplies mains power, follow local electrical requirements and ask a qualified professional when routing passes through walls. A tidy station should remain accessible, serviceable, and safe after the lights go out.

Test, Maintain, and Update the Station Regularly

How to Manage Cables for a Multi Device Station?

Test, Maintain, and Update the Station Regularly

A multi-device station needs regular testing, not occasional cleaning. I check every cable once a week for cuts, loose plugs, bent ends, and unusual warmth. I also test each device separately before connecting everything together. This simple habit helps reveal weak connections before they interrupt work. A small label near each cable saves time during testing.

I keep power cables separate from data cables whenever possible. This reduces tangles and makes faults easier to trace. Cables should have gentle bends, not sharp folds behind the desk. I use measured lengths and leave a little slack near each device. Too much slack creates loops; too little tension damages connectors. A power meter can show unexpected energy use or an unstable connection.

The station should be updated as devices change. I review the cable layout every few months and remove unused leads immediately. New equipment may require different ports, power levels, or ventilation space. I once kept an old adapter “just in case,” and it later caused confusion during troubleshooting. That was poor organization. I now record cable type, purpose, and replacement date in a simple maintenance log. Damaged cables should be removed from service, not stored in a drawer. If a connector feels hot, smells unusual, or sparks, stop using it and ask a qualified technician to inspect the setup.

How to Manage Cables for a Multi Device Station? - Test, Maintain, and Update the Station Regularly

Management Area Inspection Dimension Recommended Check Suggested Frequency Acceptance Criteria Typical Risk Current Status
Cable Identification Labels and cable mapping Confirm that both ends of every cable are labeled and match the station diagram. Monthly Labels are readable, securely attached, and identify the connected device or port. Incorrect connections and longer troubleshooting time Ready
Physical Condition Jacket, connector, and strain relief Check for cuts, kinks, crushed sections, exposed shielding, bent contacts, and loose connector shells. Weekly No visible damage; connectors lock correctly without excessive force. Intermittent signals, short circuits, or electric shock Monitor
Cable Routing Bend radius and pathway Verify that cables are not sharply bent, tightly bundled, trapped under equipment, or routed across walkways. Weekly Cables follow a defined route and maintain the minimum bend radius specified by the cable type. Signal loss, conductor fatigue, and trip hazards Ready
Power Separation Power and data cable spacing Inspect whether high-voltage or high-current power cables are separated from sensitive data and audio cables where practical. Monthly Power and signal paths are separated or crossed at approximately right angles when they must intersect. Electromagnetic interference and unstable data transfer Ready
Connectivity Test Continuity and signal performance Test suspected cables with a suitable continuity tester and verify device communication after reconnection. After changes All required conductors pass; connected devices operate without errors, dropouts, or unexpected resets. Undetected cable failure or service interruption Ready
Power Safety Load, adapters, and power strips Review total connected load, inspect adapters for heat or damage, and keep ventilation openings unobstructed. Monthly Load remains within the rating of the circuit and power distribution equipment; no overheating or burning smell. Overheating, fire, or unexpected shutdown Monitor
Cable Support Clips, sleeves, trays, and ties Check that supports hold cables without compressing them and that reusable ties are not overtightened. Quarterly Cables are supported at suitable intervals and can be removed without cutting adjacent cables. Insulation damage and difficult maintenance Ready
Dust and Cleaning Connectors, vents, and cable channels Remove dust using a dry, lint-free method and clean around ventilation areas without applying liquid to connectors. Monthly Connectors remain dry and free of debris; airflow around powered equipment is unobstructed. Heat buildup, corrosion, and poor contact Ready
Change Control Station diagram and inventory Update the cable map, port list, device inventory, and spare-cable record whenever equipment is added or removed. After changes Documentation reflects the physical station and includes date, change description, and responsible person. Configuration errors and repeated diagnostic work Update Due
Spare Management Replacement cables and adapters Keep tested spare cables separated by function and length; remove damaged or unidentified spares from service. Quarterly Each spare is labeled, visually inspected, and suitable for the required connector and signal type. Delayed repairs and incompatible replacements Monitor
Post-Maintenance Test Functional and stability verification After maintenance, power up the station in a controlled sequence and test every connected device and essential function. After changes All devices start normally, remain stable during operation, and show no warning indicators or connection errors. Hidden faults after maintenance Ready
Retirement and Replacement Age, compatibility, and recurring faults Replace cables with repeated failures, obsolete connectors, damaged insulation, or insufficient capacity for the updated station. As required Replacement cable meets the required electrical, mechanical, and environmental specifications. Recurring downtime and safety incidents Ready

Recommended practice: disconnect power before inspecting or rearranging cables, follow applicable electrical safety procedures, and record every station change in the maintenance log.

FAQS

What devices should I include in a cable inventory?

List laptops, monitors, phones, docks, lamps, storage drives, and accessories. Record power needs, ports, connectors, and normal positions. Do not trust memory alone. I once found eleven cables after counting six.

Why should I measure each cable route?

Measuring prevents excessive slack, long coils, and strained connectors. Choose the shortest practical route. Leave a small service allowance for movement and maintenance.

How can I identify each cable’s function?

Group cables as power, data, display, or peripheral connections. Label both ends with the device, purpose, and destination. “Monitor 2—Display—Port B” is clearer than “cable.”

Should power and signal cables be separated?

Separate them where possible, especially near sensitive audio or display equipment. When paths cross, use right angles. This can reduce interference and simplify troubleshooting.

How should cables be secured under a desk?

Use reusable ties, clips, or a shallow cable tray. Leave gentle bends near plugs and ports. Avoid tight loops, sharp edges, and crushed cable jackets.

How can I protect cables on the floor?

Route them along a wall whenever possible. Use a protective cover for unavoidable floor runs. Never leave loose cables across a walking path. That setup is not worth the trip hazard.

How do I check whether a cable is suitable?

Confirm its charging, data, and display capabilities before installation. Check power levels and data speeds in manuals or markings. Similar-looking cables may perform very differently.

How often should I inspect a cable station?

Inspect it monthly for loose clips, bent plugs, warm adapters, and damaged jackets. Review labels and unused cables every few months. Recheck the layout after one week. Daily use exposes problems planning misses.

What should I do when cables pass through walls?

Follow local electrical requirements for mains-powered cables. Ask a qualified professional when wall routing is involved. Do not conceal damaged cables inside enclosed spaces. Access matters.

Conclusion

How to manage cables for a multi-device station begins with understanding every device, its power needs, and the type and length of cables required. Create a simple inventory before arranging anything, then choose a practical layout that keeps frequently used devices accessible while placing power sources and connection points within easy reach. Group cables by function, such as power, data, audio, or display, and label both ends so each connection can be identified quickly.

Once the layout is planned, route cables along consistent paths and secure them with reusable ties, clips, or sleeves. Conceal unnecessary slack without bending cables sharply or placing them where they may be pinched, overheated, or exposed to frequent foot traffic. Leave enough flexibility for adjustments and device movement. Finally, test every connection, check for interference or loose plugs, and review the station regularly as equipment changes. A short maintenance routine can prevent clutter, reduce wear, improve safety, and make future upgrades much easier.

Charlotte

Charlotte

Charlotte is a seasoned marketing professional with a deep understanding of the company's portfolio and a passion for elevating its presence in the market. With a keen eye for detail and a commitment to excellence, she ensures that our professional blog is regularly updated with insightful articles......